
The Nivalis Nights trainer is an unofficial PC mod that adds an in-game control panel, item spawner, relationship editor, staff editor, time controls, and several convenience toggles. Trainer version 1.0.1 is described by its author as compatible with the Nivalis Nights launch build, labelled 1.0 in the mod notes, through either BepInEx 6 for Unity IL2CPP or MelonLoader 0.7.3 and later 0.7.x releases. Choose one loader only; do not install both for the same trainer setup.
Press F1 after loading a save to open or close the trainer. Before changing money, skills, travel access, recipes, relationships, or staff levels, make a manual save and preserve a backup you can return to. Those edits can remain in the game save after the trainer is closed or removed. Ordinary toggles, by contrast, start disabled whenever the game launches.
This guide covers the trainer’s documented version 1.0.1 behavior. A later Nivalis Nights update may require a compatible trainer update, even if the menu still opens.
Compatibility and Loader Choice
Nivalis Nights is a Windows PC game, and the trainer requires an external mod loader. The game does not currently provide official modding tools, so this is not a built-in accessibility menu or a developer-supported command console.
The trainer is distributed in two versions:
| Trainer package | Required loader | Current compatibility note |
|---|---|---|
| BepInEx version | BepInEx 6 for Unity IL2CPP | Recommended option for trainer version 1.0.1 |
| MelonLoader version | MelonLoader 0.7.3 or a later 0.7.x version | Supported, but some version 1.0.1 performance improvements were initially specific to the BepInEx build |
Select the package that matches the loader you actually installed. Files intended for one loader should not be mixed into the other loader’s folders. If you already use other mods, note their names and versions before changing the setup; that information is useful if you later need to isolate a conflict.
The compatibility statement applies to the launch build identified in the mod notes. Treat any game update as a compatibility boundary. If a feature becomes unavailable after an update, do not assume reinstalling the same files will repair it. Check that the trainer version explicitly supports the updated game build before making persistent edits.
Preparation Before Installation
Take a few reversible precautions before adding the trainer:
- Launch Nivalis Nights normally and confirm that the unmodified game reaches a playable save.
- Make a manual save from the Pause Menu. The game also autosaves at the end of each day, but the trainer’s time skip does not create an autosave.
- Choose either BepInEx 6 for Unity IL2CPP or MelonLoader 0.7.3 or later in the 0.7.x line.
- Download the trainer package made for that loader rather than combining files from both releases.
- Record the game version, loader version, trainer version, and other installed mods. These four details are the starting point for useful troubleshooting.
A backup matters because several trainer commands write lasting progression changes. Closing the panel does not roll back edited money, skills, travel access, recipe knowledge, or relationships. Removing the trainer DLL also does not promise to restore earlier values. If you want to compare modified and unmodified progress, preserve an earlier save before the first edit.
Installing or Updating the Trainer
Use this installation sequence for either supported loader:
- Install your chosen loader into the Nivalis Nights game folder.
- Launch the game once with the loader installed, then close the game. This lets the loader complete its initial setup.
- Extract the trainer package’s Mods or BepInEx folder into that same Nivalis Nights game folder. Use the folder supplied for your chosen loader.
- Start the game and load a save. The trainer’s data-dependent features are not expected to work correctly from the title screen alone.
- Press F1 to open the trainer panel.
When updating an existing trainer installation, replace the existing trainer folder with the newer matching package and confirm the file overwrite when prompted. Do not switch loaders as part of an ordinary trainer update unless you intentionally remove and replace the complete loader setup.
If F1 opens the menu, drag its title area to reposition it. Hover over a feature name to see its short explanation. Trainer version 1.0.1 draws the panel at a smaller scale so its rows fit on screen, but visual problems can still occur after a scene change.
Trainer Controls and Default Keybinds
The panel provides clickable controls as well as default keyboard shortcuts. These are the documented defaults:
| Key | Default action | Practical use |
|---|---|---|
| F1 | Show or hide the trainer | Opens the panel and returns control to the game when closed |
| F2 | Unlimited Energy | Enables the energy convenience toggle |
| F3 | Curfew Ghost | Enables the curfew-related toggle |
| F4 | Unlimited Boat Fuel | Removes the need to manage boat fuel while enabled |
| F5 | Instant Greenhouse Growth | Completes greenhouse growth through the trainer toggle |
| F10 | Unlimited Items | Enables the trainer’s unlimited-items function |
To change a shortcut, hover over its key box inside the trainer menu, click the edit icon, and press the replacement key. Press Esc if you want to cancel without assigning a new key. Custom keybinds are remembered between sessions, while the feature toggles themselves start turned off on each launch.
Rebinding is useful when a default conflicts with another mod, an overlay, or your preferred game controls. Change one binding at a time and verify it before editing the next. That makes it much easier to identify whether a key failed to save or another program intercepted the input.
Progression and Convenience Features
The main panel combines temporary conveniences with commands that alter saved progression. They should not all be treated the same way.
The temporary toggle group includes Unlimited Energy, Curfew Ghost, Unlimited Boat Fuel, Instant Greenhouse Growth, and Unlimited Items. Their enabled state resets when the game is relaunched. This reset gives you a predictable starting state, but it does not undo any items or progress produced while a toggle was active.
The progression controls include:
- Unlock All Travel, which opens the trainer’s travel unlock function.
- Unlock All Recipes, which changes recipe access. Its Unlearn button resets recipes to the starting set rather than reconstructing every earlier point in your progression.
- Discover All Fish, which marks every fish as caught in the fish log.
- Edit Money, which accepts the amount as displayed in the game, including cents. Entering
10000sets the balance to 10,000.00. - Edit Skills, which lets you select a skill, assign a level, or use Max All.
- Edit Staff, which lets you choose one of your venues and change staff Cooking, Serving, Cleaning, and Managing levels individually or maximize them together.
Use narrow edits when possible. If your goal is to recover from a single resource bottleneck, changing only the relevant value makes the result easier to understand than simultaneously unlocking travel, recipes, fish, money, and skills. It also reduces the number of persistent changes you would need to reverse manually.
Relationship Editor
Open the dedicated relationship screen with the Relationships button at the bottom of the trainer. The editor covers more than 100 characters and lets you change Friendship, Romance, Business, and Enemy relationship levels. Version 1.0.1 also adds name search, which is the most direct way to locate a specific character.
Relationship edits can affect dialogue and story progress. That makes this screen more consequential than a temporary energy or fuel toggle. A high value is not merely a display preference: it can change how the game evaluates a character relationship. Save before editing, change one character or relationship type at a time, and return to the game to inspect the result before altering additional characters.
The panel can clear enemies, make characters friends, or maximize business relationships, but broad changes make later diagnosis difficult. If dialogue or progression behaves unexpectedly, you need to know which value changed. A focused edit preserves that connection; a mass edit may not.
After a small relationship edit, return to the game’s Known Characters page and inspect the selected NPC’s displayed relationship indicators. Compare them with the state before the edit, and check the next conversation before changing another character. This is a visible check of the saved relationship; it cannot guarantee that every later story flag remains intact.
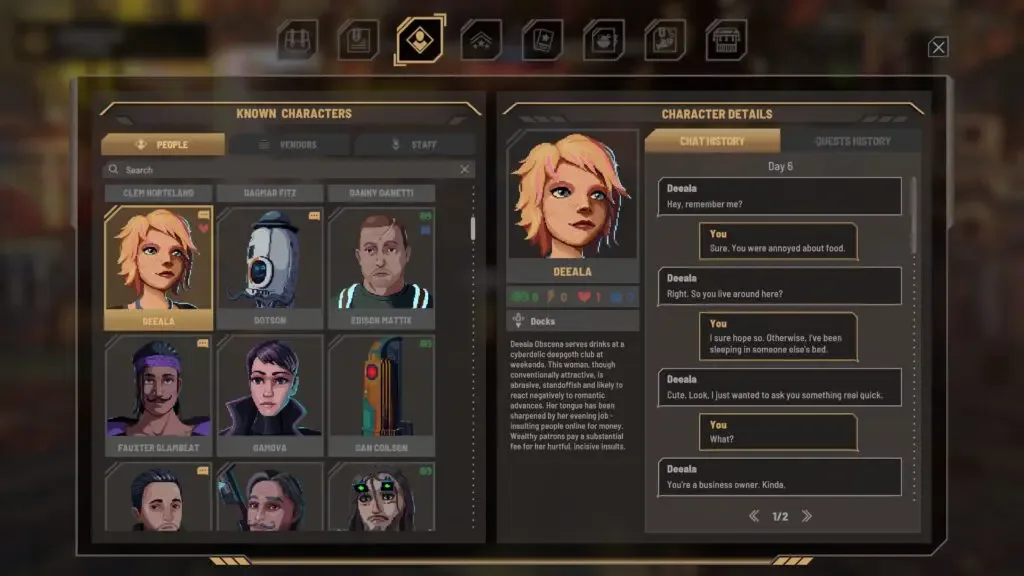
Check the selected character’s relationship in the game after an edit.
The trainer does not provide a documented universal rollback that recreates each character’s exact earlier state. Restoring the pre-edit save is therefore the clearest reversal method when a relationship change produces an unwanted story result.
Item Spawner
Select Spawn Items at the bottom of the trainer to open the item-spawning screen. It can search and filter inventory-compatible food, drinks, furniture, and other items. Select an item, choose an amount from 1 to 999, and press Spawn. The new items go directly into your inventory.
Clicking an item also opens a details tray containing its picture, tags, and description. Use those details before spawning similarly named objects. Filtering by Food, Drinks, Furniture, or Other reduces the result set and is safer than selecting an unfamiliar entry from an unfiltered list.
Inventory space and downstream game behavior are separate from the act of spawning. The documented result is that the chosen item enters your inventory; the trainer does not promise that every quantity is sensible for ordinary progression. Start with the smallest amount that solves the immediate need, confirm the item appeared correctly, and only then add more.
Spawning one item at a time also makes recovery simpler. If the wrong object was selected, you can identify the latest addition instead of sorting through hundreds of newly created entries.
Time Skip Behavior
The trainer supplies two time-skip destinations rather than a free-form clock editor:
| Current time range | Available destination | Result |
|---|---|---|
| 18:00–07:59 | Morning | Passes the night, including curfew, and places you at 08:00 with full energy where you are; no bed or apartment is required |
| 08:00–17:59 | Evening | Advances the clock to 18:00, when the evening begins and sleeping becomes available |
Skipped time passes without the player, and the trainer does not make an autosave during the skip. This is important because Nivalis Nights normally autosaves at the end of a day. Do not treat the Morning button as equivalent to completing a normal end-of-day save cycle.
Make a manual save before skipping if you are testing how the time change affects your current activities. After the skip, check your location, energy, active objectives, and any time-sensitive plans before continuing. If the outcome is not what you expected, return to the earlier save instead of stacking more time skips on top of it.
A Reversible First-Use Workflow
The safest way to learn the trainer is to separate installation testing from save-changing experiments:
- Confirm that Nivalis Nights launches normally before installing a loader.
- Install one supported loader, launch once, and close the game.
- Add only the matching trainer package.
- Load a save and press F1. At this stage, verify only that the panel opens and can be moved.
- Test a temporary convenience toggle, then turn it off again. Relaunch the game and confirm that toggles begin disabled.
- Make a new manual save before opening Money, Skills, Staff, Relationships, Recipes, Travel, Fish, or the item spawner.
- Perform one small edit and return to normal play long enough to verify the visible result.
- Keep the edited save only if the result is acceptable. Otherwise, restore the save from before the edit.
This sequence provides clear checkpoints. If the menu fails at step four, the problem is probably installation or compatibility rather than a particular saved value. If the menu works but one feature reports unavailable, the game may not have loaded the data that feature needs, or a game update may have changed the relevant system.
Troubleshooting a Trainer That Does Not Work
If pressing F1 does nothing, first confirm that you loaded a save rather than remaining at the title screen. Then check that NivalisTrainer.dll is inside the folder supplied for your chosen loader, preserving the archive’s directory structure. Restart the game and inspect the mod-loader logs for an entry containing Nivalis Nights Trainer.
Work through these checks in order:
- Confirm that the installed trainer package matches BepInEx or MelonLoader, whichever is actually present.
- Confirm the loader version: BepInEx 6 for Unity IL2CPP, or MelonLoader 0.7.3 or a later 0.7.x version.
- Confirm that only one of those two trainer setups is active.
- Confirm the game is still on a version supported by the trainer.
- Load a save before using any feature that depends on game data.
- Check whether another installed mod or overlay uses F1. If necessary, use the trainer interface to assign a different key once the menu can be opened.
When a feature says its data is not loaded yet, load a save and try the feature again. If it shows UNAVAILABLE after a Nivalis Nights update, preserve the matching log messages. That state may reflect a compatibility change rather than an installation mistake.
If the panel looks wrong after changing scenes, close and restart the game before replacing files or reinstalling the DLL. A visual state problem after a scene transition does not by itself prove that the installation is corrupt.
For a useful issue report, include the Nivalis Nights version, loader name and version, trainer version, other installed mods, relevant log lines, and exact reproduction steps. State whether the problem happens before loading a save, after loading it, or only after a particular scene or trainer command.
Uninstalling the Trainer
To remove the trainer itself, delete only NivalisTrainer.dll from its installed folder. This narrow removal avoids treating unrelated loader or mod files as if they belonged to the trainer.
Uninstalling the DLL stops the trainer panel from loading, but it should not be treated as a rollback mechanism. Saved changes to money, skills, travel, recipes, relationships, and other edited progression may remain. Restore an earlier save if you need the exact pre-trainer state.
After removal, launch Nivalis Nights and load a save to confirm that F1 no longer opens the panel. If you also intend to remove the mod loader, follow that loader’s own removal procedure separately; deleting unrelated files is outside the trainer’s uninstall instruction.
Practical Limitations
The trainer is designed for the version it explicitly supports. A working panel does not guarantee that every individual function remains compatible after a game update. Persistent progression edits can influence later dialogue or story behavior, especially when relationships are changed. Time skips advance the world without creating an autosave, and mass unlocks do not provide a documented way to reconstruct every previous value.
Use temporary toggles for convenience and persistent editors for narrowly defined changes. Keep an untouched save before experimenting, verify one result at a time, and stop using any feature that becomes unavailable after an update. That approach preserves a clear path back while still giving access to the trainer’s energy, curfew, fuel, greenhouse, item, travel, recipe, fish, time, money, skill, staff, and relationship controls.